If you’re planning to monetize you’re website, you must have been planning to add that little add-to-cart button with credit card affirmations am I right?
Well you’re in luck, because today we are going to cover just that!
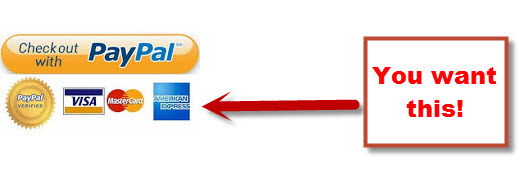
To add in the credit card payment on your website, we are going to go through PayPal as it allows you to have not only the PayPal payment button, but also the credit card payment option as well to give your buyer more choices of payment.
Now if you’re new to this you must be wondering…
Why Use PayPal?
There are 3 reasons as to why we will be going through PayPal to get the Credit Card payment’s Buy Now button and the first one is that PayPal give your buyers more choices of payments.
When you use PayPal, you will get the “Buy Now” button which gives the users 2 choices – Whether to pay through PayPal, or directly using credit cards.
Some buyers are more trusting when a PayPal button is around as they have great customer service and will help you refund your money if anything goes wrong so seeing the PayPal payment choice will indirectly increase your rate of conversion.
Do also take note that PayPal has connections with almost all the credit card companies in the world so you won’t have to worry about going to all those banks one-by-one since your buyers can just pay through PayPal.
Sweet, right?
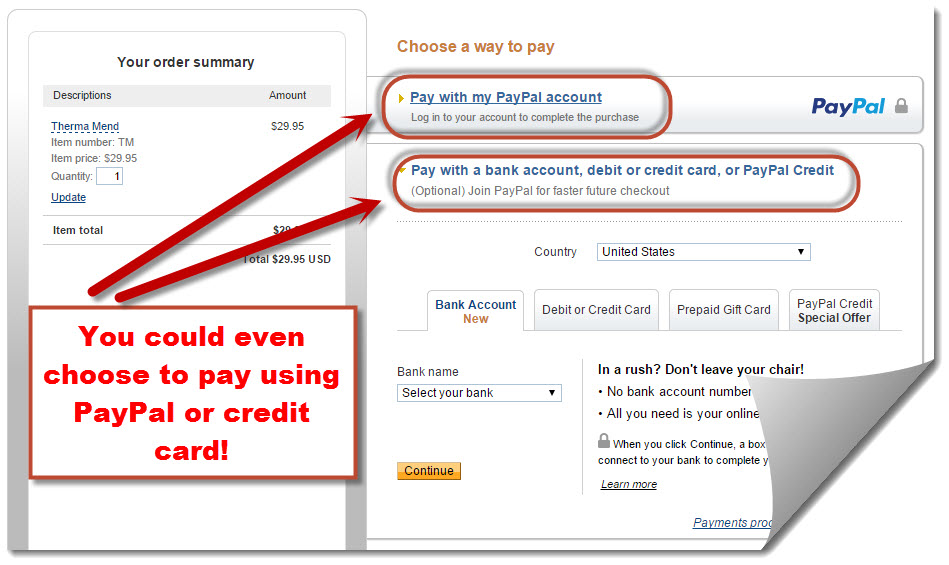
Your buyers can choose their preferred method of payment
Second is the ease of use.
One of the best things about using Paypal’s ‘Buy Now’ button is that it doesn’t just restrict your buyers to paying through PayPal alone, it also gives them the ability to choose which bank you want to use for your payment or which card, all within just one click of a button.
Thirdly, having the PayPal symbol along with the other credit card logos can also signify legitimacy of a product.
Sounds cheesy I know but there is a story to it.
As some of you might know, I regularly do reviews for Internet Marketing scams (You can see my list here) and whenever I do research for those scams, I usually scour almost every part of the internet to make my reviews more thorough (Which is why my reviews are all around 3,000 words 😉 ).
And throughout those reviews, I’ve come across a few products which are SO huge of a scam that PayPal doesn’t want to allow the use of its ‘Buy Now’ button there as it does not want to be seen affiliated with a scam.
One of those programs is a well-known scam called Empower Network so after PayPal decided to stop allowing them to utilize PayPal for transactions, people are gaining more trust in its name.
How to Add the Credit Card Payment Button on Your Website? [My 7-Step process]
The process of getting your first buy now button may be tedious at first but eventually, you’ll get used to it after a while.
Here’s a video I made to help you out…
Otherwise, you can always choose to read my magnificent 7-step written guide on how here…
Step #1 Head on to PayPal and Go to the Merchant Services Tab
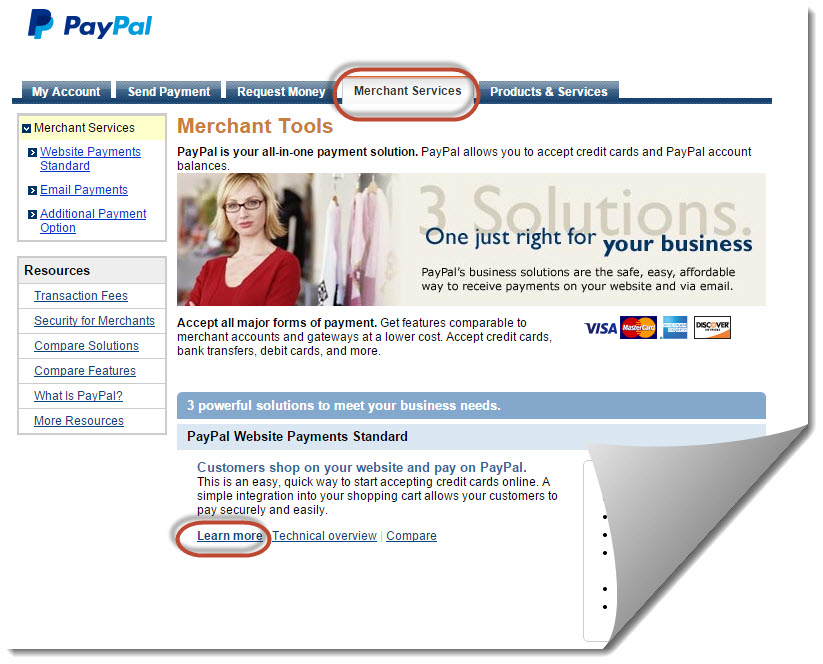
You need to go to the Merchant Services tab in PayPal
After logging in to your PayPal account, head on to the “Merchant Services” tab which is 3 tabs right from the “My account” tab.
Once you’re there, scroll down to the “PayPal Website Payments Standard” section, and click on learn more.
Step #2 – Create Payment Buttons For Your Website
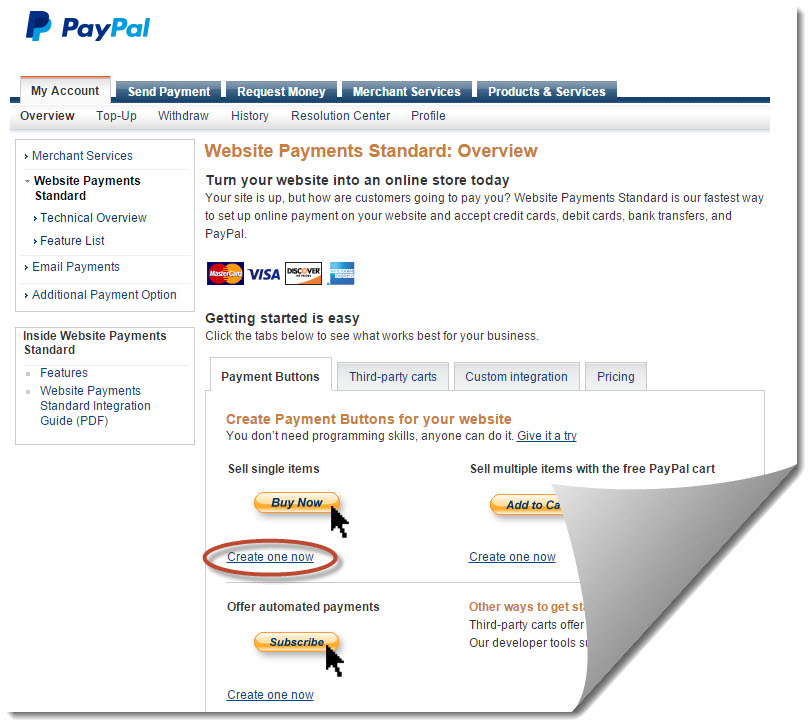
Click on “Create one now”
Once you’re at this page, you will pretty much know what to do as there are 3 choices to choose from which are “Sell single items”, “Sell multiple items with the free PayPal cart”, and “Offer automated payments”.
Automated payments are usually used for membership programs whereas multiple items are for ecommerce sites like Steam and Amazon.
You can click any one of those but for the purpose of this lesson, we’ll go ahead with “Sell single items” so you can go ahead and click on “create one now”.
Just so you know, single items refers to any items that you are planning to sell which is of one type like maybe you want to sell an eBook or a cool eraser (Just saying).
Step #3 – Fill in Payment Details
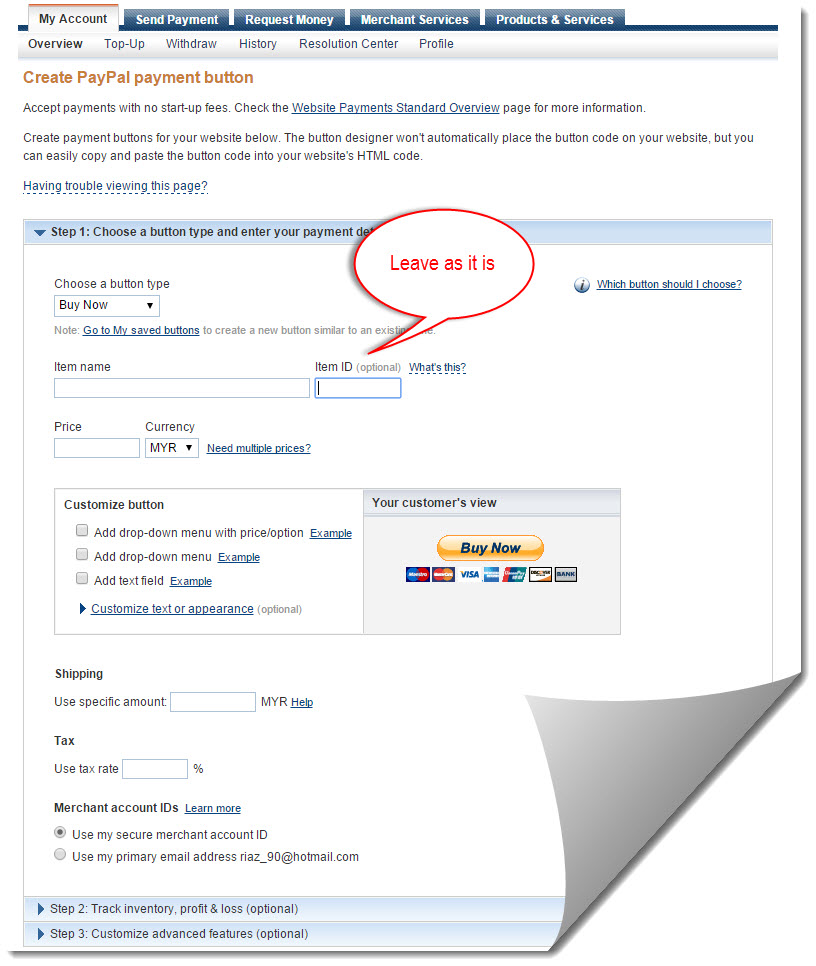
PayPal payment detail form (step 1 out of 3)
Heads up for the longest step for this process!
After clicking on the “sell single items” section, you will be brought to a 3-step form with step 1 of that form being the “Choose a button type and enter your payment details” section.
You can practically fill in everything by yourself here but I’ll explain the details just in case.
At the “choose a button type” section, you will have choices of choosing either a shopping cart, a buy now, a donations, a gift certificates, or a subscriptions button which are all customized differently (In terms of words of the button, NOT the design).
They are all self-explanatory as shopping cart is for eCommerce, “Buy now” for buying things, donations is for websites that are not selling anything but wanting to get funds from good Samaritans (Usually done by YouTubers) and subscription for membership sites who want recurring payments.
Item name can be filled according to what you want to fill in, like “Jessica’s t-shirts” whereas item ID is an optional item coding if you have any.
For the price section, simply fill in the price that you want to charge for your products.
You could choose any currency you want if you’re targeting demographically but if you want to sell internationally, I advise changing the currency as USD because that is the currency for business worldwide.
However if you are planning on charging differently according to the type of that item (Like t-shirt sizes), leave that blank because at the customizable button section which comes next, you will have the choice of adding a drop-down menu with price option.
For the customize button, you will have 3 choices to choose from which are “Add drop-down menu with price/option” (Which is the one I mentioned earlier), “Add drop-down menu”, and “Add text field” which is more commonly used for personalized messages.
Below the “add text field” section is one of the most important part of all which is the “Customize text or appearance” section.
This part is important because from here, you can choose to add credit card logos on your Buy Now button which further gives assurance to your buyers that credit cards can also be used.
This will make your Buy Now button look way better because without those credit card logos, it will look really bland and unprofessional.
After that, comes the “shipping” section and you can basically charge according to your liking but if you are selling digital products like eBooks, you won’t have to charge for shipping though, lest people will think of you as a money-making clotpole.
As for the tax section, you need to fill this according to your country’s tax rate which you can just simply find on Google if you are unsure.
Last but not least is the Merchant ID.
The Merchant ID will show your PayPal ID during the transaction process instead of your personal email because if your email is there, people will start to spam you which is something not many of us like.
Still, some people prefer to make their emails visible during the transaction process as they feel that it can help in creating trust.
Step #4 – The Track Inventory, Profit and Loss Section
PayPal payment detail form (step 2 out of 3)
Phew that previous part was really long.
After the merchant ID section, click on step 2 which is the “Track Inventory, Profit and Loss” Section.
Don’t worry though, the hard part is all over because we are almost done.
There are only 3 things in this section which are “Save button at PayPal”, “Track inventory”, and “Track profit and losses”.
You can tick the “Save button at PayPal” part because doing that will ensure your newly-created PayPal Buy Now button saved within your profile.
The Track Inventory part which comes after on the other hand, is meant for tracking the number of sales you want, according to the inventory you have at hand.
This is important because sometimes people will make payment for your tangible product (Like a t-shirt) but in reality, your stock is finished which will leave you in quite a bit of trouble.
But if you are selling digital products, you won’t have to worry much because you have no stock to sell as everything is online which is the beauty of doing an online business 😉 (If you want to know how to make money selling digital products, click here to read my latest blog post on that).
Last but not least is the “Track profit and losses” box which as the name implies, tracks the amount of sales you’ve made and the money as well.
This is optional but if you want to do some tracking for split-testing, you are more than welcome to tick that box.
Now that we’re done with this part, let’s move on to the last step of this annoying payment detail form which is…
Step #5 – Customize Advanced Features
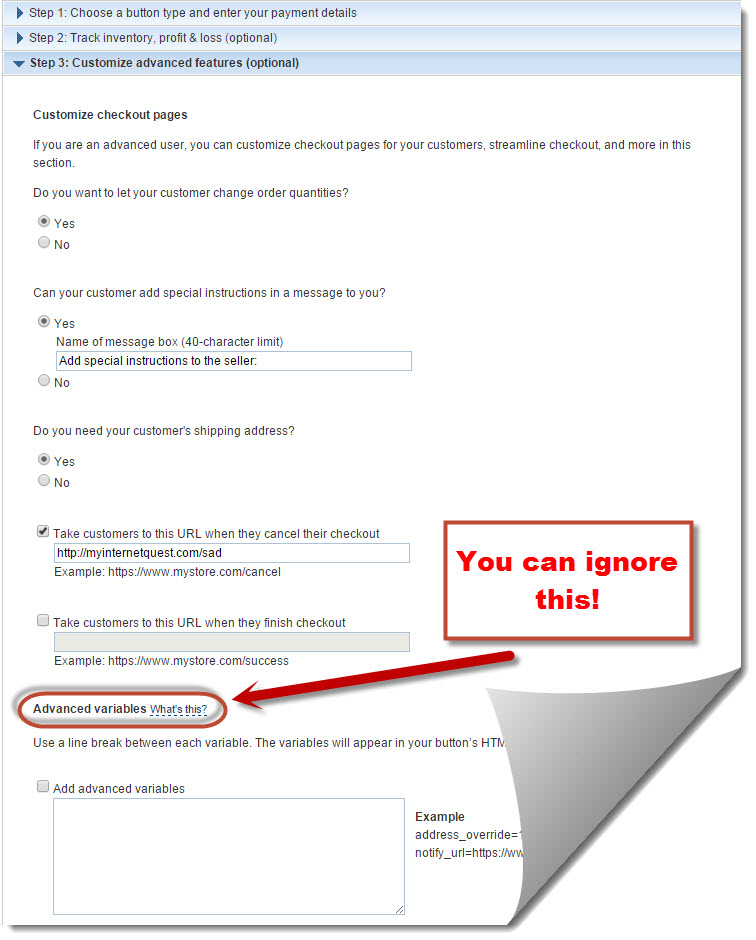
PayPal payment detail form (step 3 out of 3)
After finishing step 2, we now focus on step 3 of that form which is the “Customize Advanced Features” section and lucky for us, this is the last part of this tedious form-filling.
Let’s have a look at the first question which is, “Do you want to let your customer change order quantities?”
You should tick that as “Yes” because if not, your customers will get frustrated at the process.
You will never know when someone wants to add more products so it is much better to give your customer that freedom.
The next question would be, “Can your customer add special instructions in a message to you?”
Ticking on “Yes” for this will allow your customers to send you messages and obviously, it comes to mind that we should let them have that ability.
But if you are selling a downloadable product, you can click on “No” because nobody is going to ask you anything if there is a clear download link for a file, don’t you think?
Moving on to the next question, we have “Do you need your customer’s shipping address?”
One thing to bear in mind is that if you click on “Yes”, your customer will have that option to fill in their shipping address on the form which will give them a longer time to fill so make sure to only use this on necessary products, like clothes for instance.
If you are selling digital products, then you don’t need a shipping address so you can just click on “No”.
The reason I’m you this is because I have met a lot of newbie Internet Marketers who want postal addresses for split-testing purposes which is something not really helpful so why bother?
The next question is regarding the URLs that you want to bring your customers to after they purchased or if they cancelled their transaction process.
For this part, you could simply add in URLs of your home page as that is what most websites owners would do but if you want to go one step further, you could create a specific page to say “Thank you for your interest” or “sorry that our product is boring you!” which could really help turn the tides in your favour as customers would feel that it is more personalised.
And you’re done!
Simply click on “Create Button” and let’s go on with the next step.
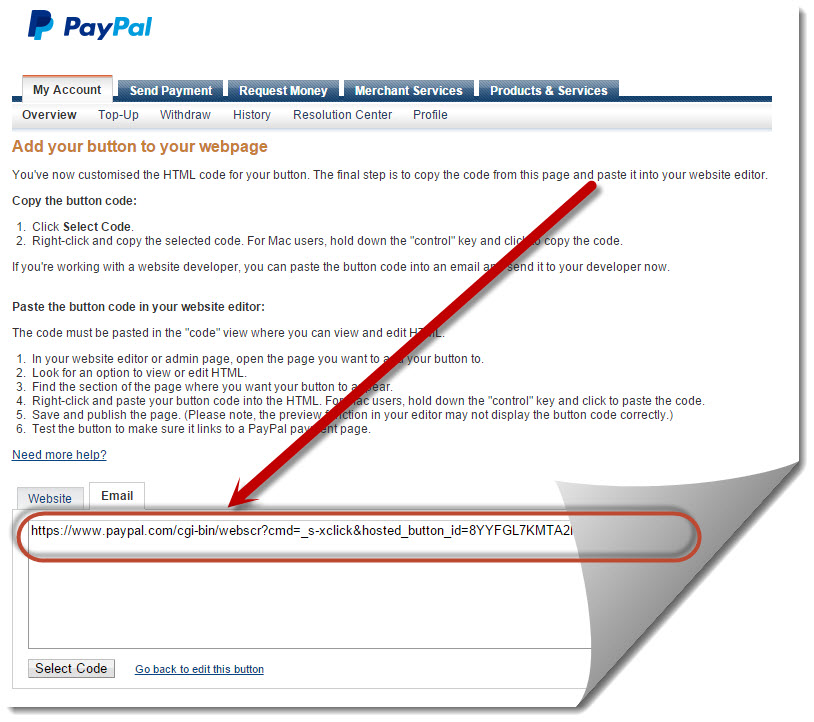
Step #6 – Get Your Buy Now Button Code
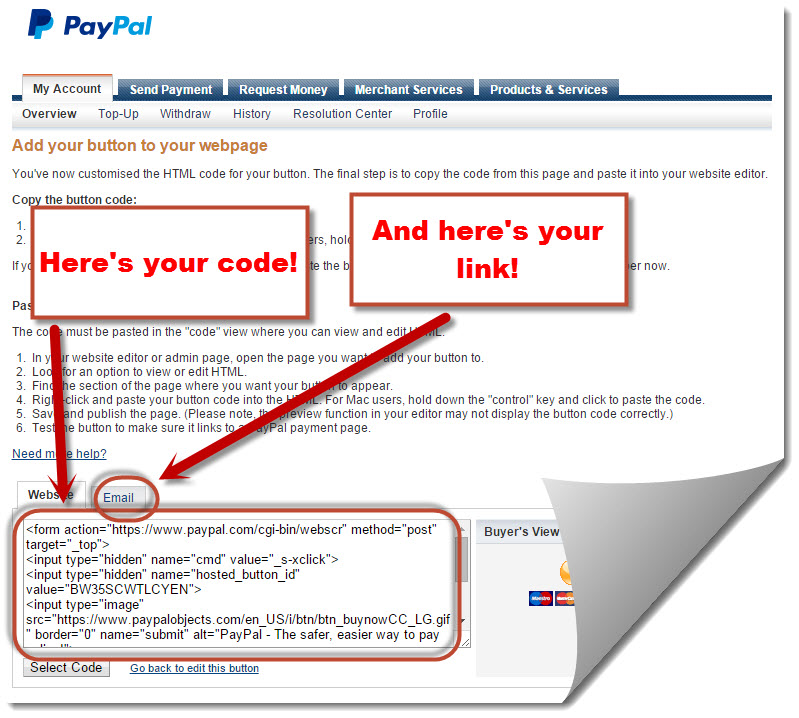
Get your button code which you can add to your website
Voilà! That tedious form filling process is done!
Now that you have your Buy Now Button link, all you need to do left is to add it to your website.
Notice that there are 2 version of coding which are for website and email.
The website code is in HTML format whereas the email code is actually a link which you can simply add to anywhere you like (For example, if you want to design your own Buy Now button which you can simply use to make any image work).
Simply copy and go to your website.
Step #7 – Attaching Your Buy Now Button to Your Website

Paste your code in your text editor
So now with your copied code, head on to your website’s HTML section.
Some CMS such as WordPress have a visual section of text editor and also a HTML section where you can add that code of yours.
Simply go to the HTML section and paste it there and you’re done!
Once pasted, you could check your post preview or switch to “visual” section of WordPress to make sure and it will come out like this…
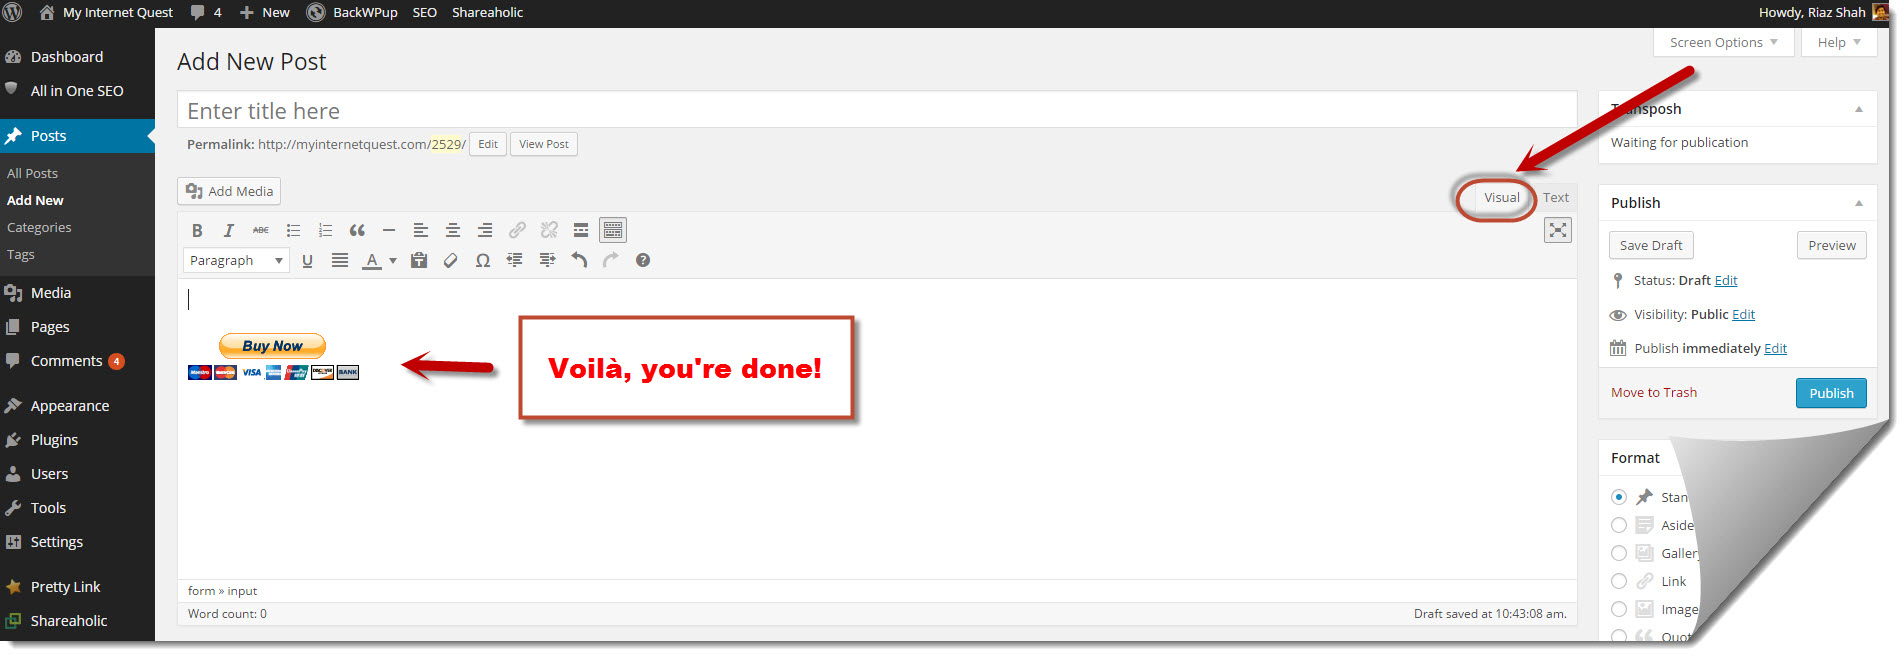
The visual look of of that code you pasted!
Easy, no?
Well not that easy actually but you’ll get used to it.
Before I leave you to your own doing, I’m sure some of you might be dying to ask me…
But what if you want to use your own customized Buy Now Buttons?
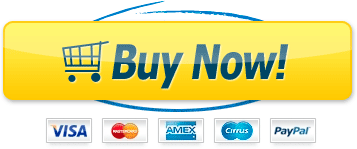
An example of a custom-designed Buy Button
Now some of you might want to add your own personalized Buy Now button which looks way better that the plain old standardized yellow button and there’s plenty of good reasons for it too because testing different types of Buy Now buttons can increase conversion rates.
This is because people are more attracted to visuals and if you use a different buy now button than what everyone is using, it will definitely stand out and make your customers look twice which means you’ve got their attention.
Get your payment link from PayPal
To add your own image, simply copy the email link code which you can get from the exact same page as where you got your website’s HTML Buy Now button code that we discussed earlier.
From there, simply head over to your website and add the link to your buy now image and you’re done!
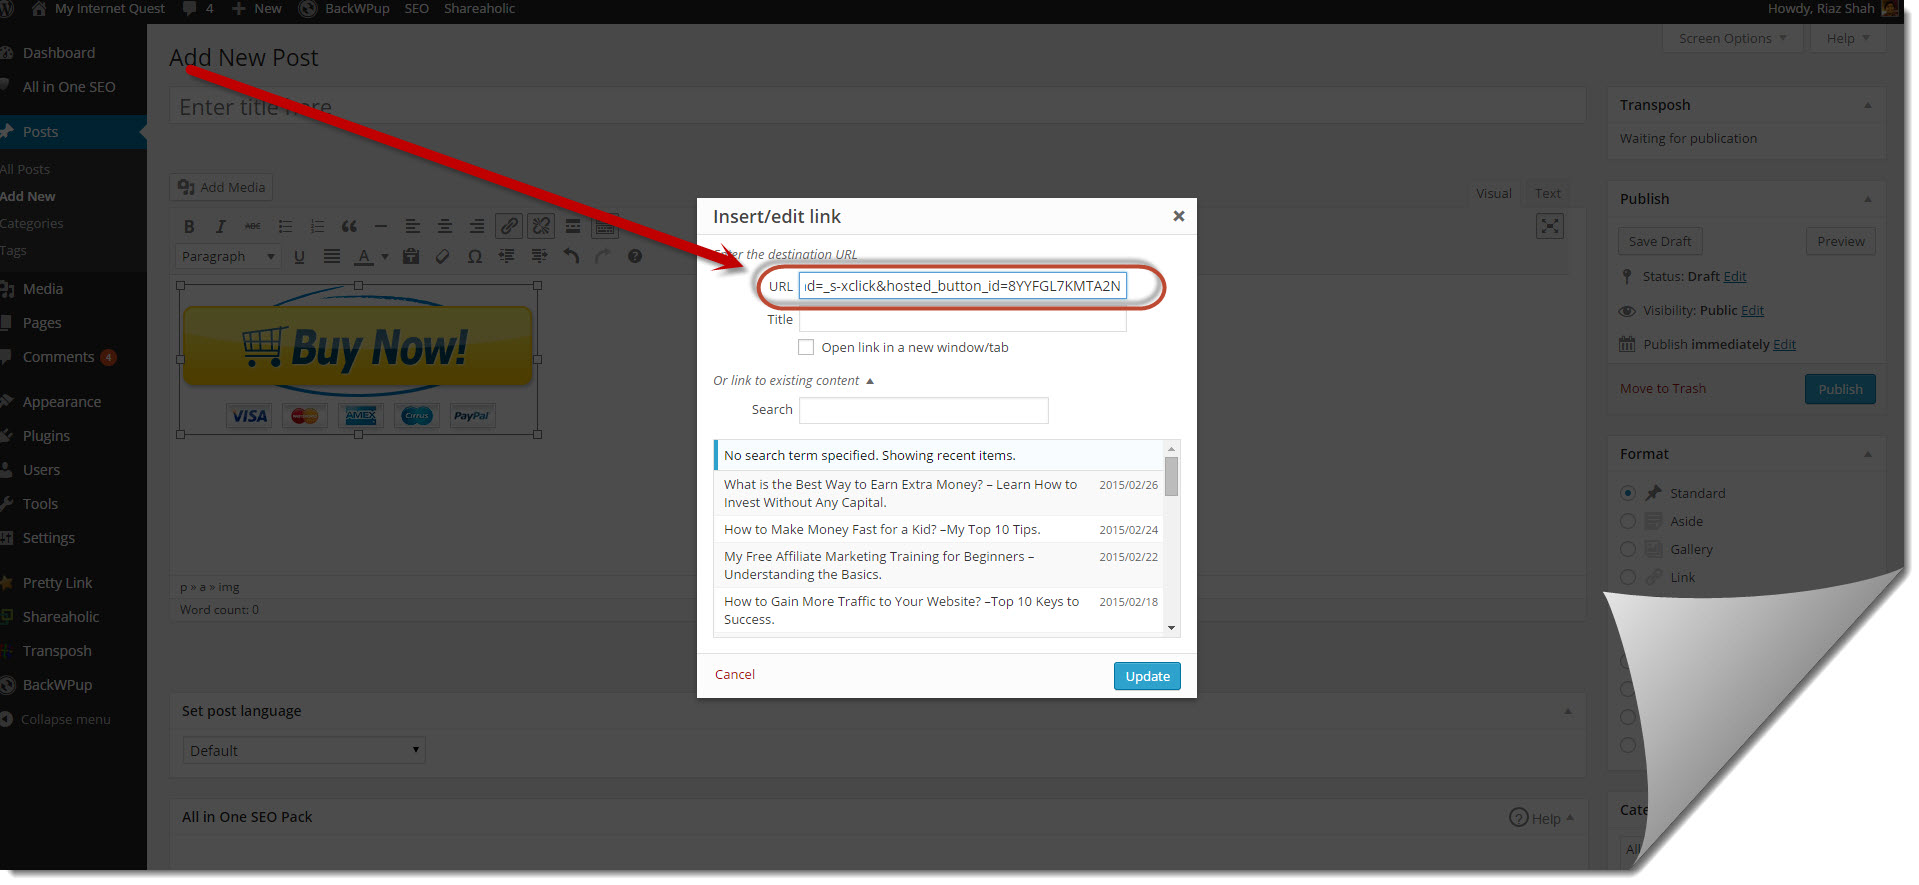
Attach that link to your image
That is all there is too it.
If you are using different website platforms like blogger and you find it complex, you might want to consider using WordPress.
Some people know that WordPress is powerful and easy to use but they are turned off with the pricing.
But what they didn’t know is that WordPress can actually be free so here’s how to take advantage of this opportunity…
Want a Free Platform for WordPress? –Learn Online Business the Only Way You Can.

To get WordPress for free, I recommend you to go to Wealthy Affiliate because not only does it teach you everything you need to know about starting an Online Business, it also provides you with free tools to help you build your website and monetize such as a website provider and a keyword research planner which you could make full use of.
There are many free website providers out there but there has never been a free-to-join Online Business course such as this.
Besides teaching you how to build a website from scratch and monetizing, you will also learn how to drive more traffic to your website by ranking your site on the first page of Google.
Take a look at this…
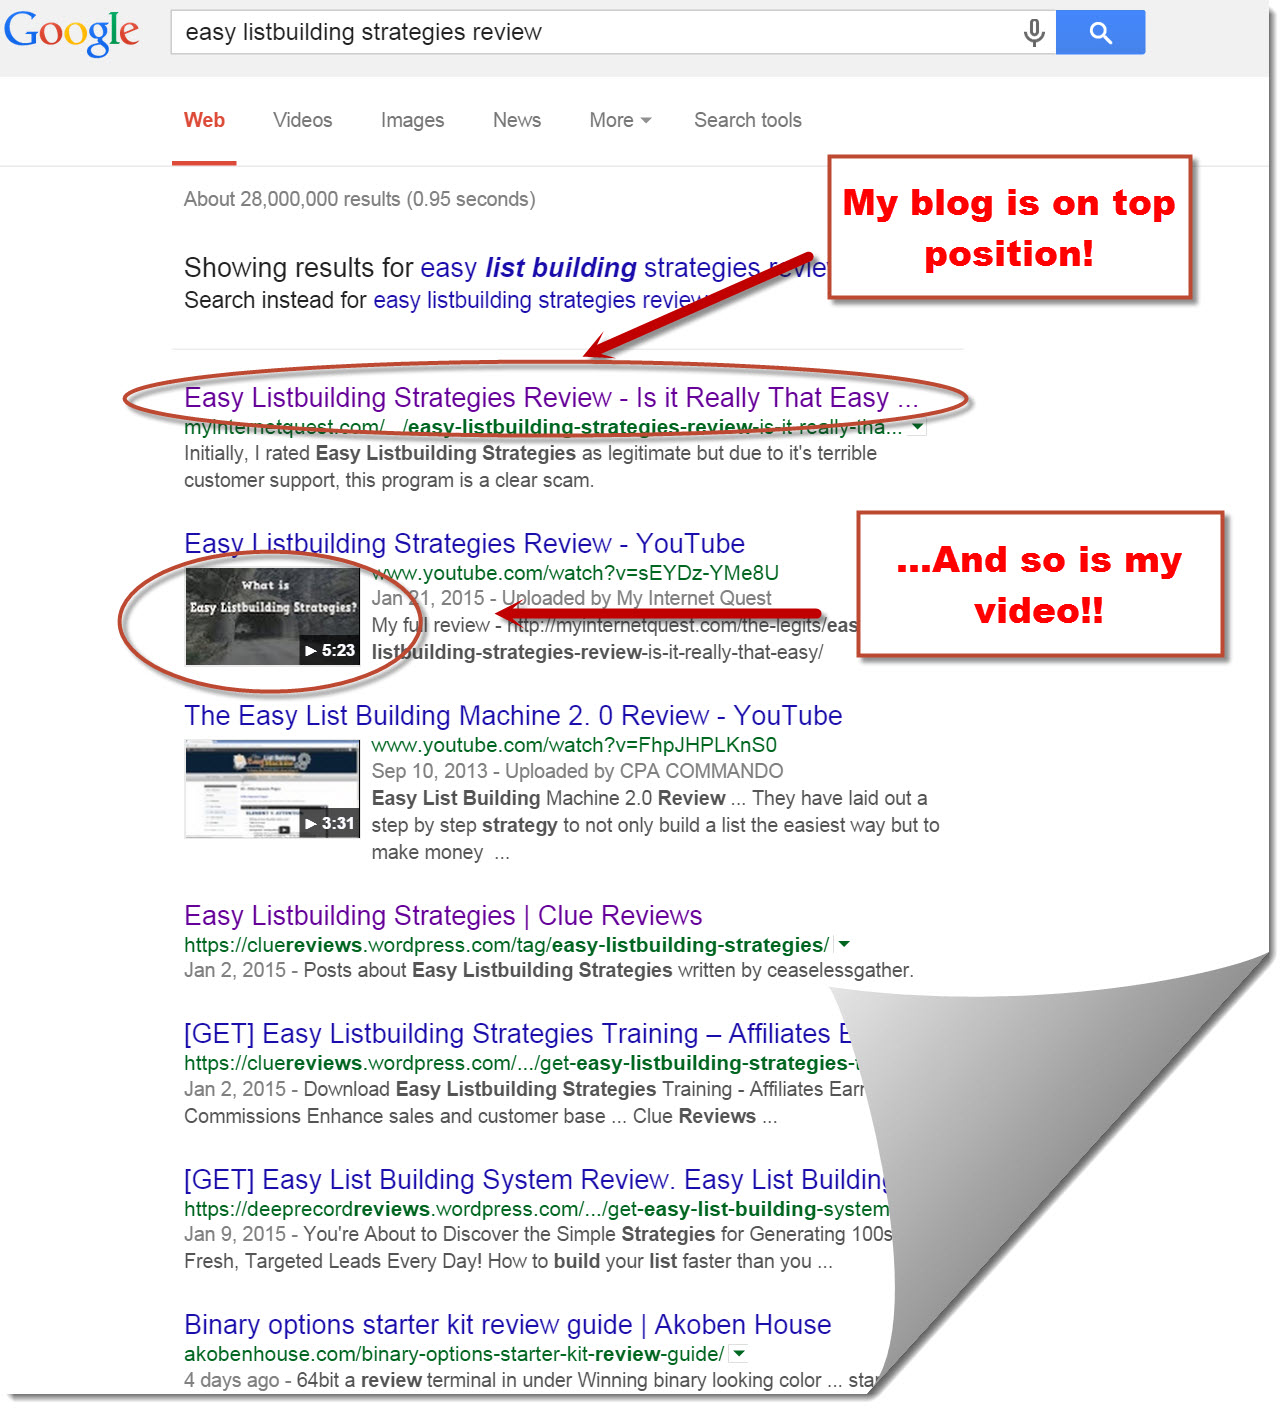
Google search results for “Easy listbuilding strategies review”
How I monetize my blog is solely from getting my website ranked high on Google so that way, I save more money from spending on risky marketing campaigns that will cost you hundreds.
If you are already doing an online business, you’ll learn tips and tricks to double your conversion rate as well as visibility too.
So what are you waiting for? Join me now!

Conclusion
Adding a Buy Now button is one of the most important parts of monetising a website because without it, your buyers won’t have a way to give their money to you.
The process may be tedious but it will all be worth it when sales started pouring in your account, as you will then know if your demand is enough for you to scale up your business or not.
If you’re interested in learning more about monetizing a website, check out my #1 recommended program here.
Thanks for reading, don’t be afraid to drop down any comments you may have below!

Photo source: Duncan C
Great Read. Is there any hidden fees and pains of online payment platforms?
No that I know of!
please tell me if it is possible to deposit the amount directly to my local bank account . if i don’t have a paypal or any other card.If yes then kindly tell me how ?
Regards:
Bilal Mubeen
Bilal, yes its possible. As i have mentioned in the post itself that PayPal is optional and you can attach your card details there should you do not have Paypal.
Thanks a lot . It is really helpful.
Been looking for this everywhere! Thanks man I thought you have to call the credit card companies in order to use their logo :3
I was thinking of the same thing when I first started Frank! We live in a world where people can sue you for the littlest things so it doesn’t hurt to be extra cautious. But credit card companies love it when they are included because they do get money for every transaction which is why they’ve made the process smooth for you when integrating on your website.
I’ve been looking fo this everywhere! Thanks, Riaz! This is such as detailed guide 😀
Anytime, Hiram.
No wonder I couldn’t find any guides on how websites can accept credit card payments, they all use PayPal! Thanks, Riaz you saved my life 😀
Anytime, Combi. PayPal is much easier to use and manage as it has connections with the major merchant cards so it is much better to just let PayPal handle the job.
Generally there is an yearly fee required that can go from
$30 to $60 or more, depending on the credit card provider.
Judgments are decided by courts, and they do not always come from debts.
If you failed to file an Answer to the summons for
credit card debt within the given period and the creditor won the
case, they will be able to gain access to your own bank account and get your money or garnish your wages legally.
Thanks for the heads up Ben!
Helpful article, Riaz! Would appreciate if you could do a video out of it, that would add a huge boost for us and you 😀
Great idea Antoine, I may just do that in a few days time 😉
I have been looking for this answer everywhere! Thanks man, I never knew the best answer for credit card payments is through PayPal, geez I missed out alot
I took me a while to find out that PayPal has the credit card payment option too, Collin so I guess I’m at the same starting point as you 😉 . Let me know if you need help with anything and thanks for dropping by!