Moving a website is one of the most difficult parts of website management because there are a lot to consider.
You need to change the DNS, you need to download backups and much more.
When I first moved my website, it took me 2 whole weeks because I had no idea on what I was doing.
I was reading forums, watch videos and STILL had no idea on how to move a website.
I was stuck, and my website was inaccessible for that 2 weeks duration.
After much perseverance and question-asking, I now know one of the safest ways to move a website from one host to another without having a downtime.
I understand how frustrating it feels to not have an answer to this issue so because that, I’m writing this tutorial on how to help everyone move their sites for free.
What is a Webhost?
When explaining to many of my friends about changing webhosts, none of them understood what I was saying so before we get to the main guide, I’d like to share with you a simple way to understand what a webhost really is and how does it work.
When talking about websites, what actually makes up a website?
A website consists of a domain, a webhost and a Content Management System (CMS) which basically is the content manager – DON’T worry, you don’t have to understand the full thing 😉
It is very much like a car whereby a domain is like the car frame, a webhost is like the car engine, and CMS is whatever that’s inside your car like the cushion and your Darth Vader bob head.
So you see, you don’t have to fully understand everything because just knowing the concept is enough.
I’ve been driving my Honda for 2 years now and I never even understood what’s happening inside my engine bonnet.
It’s like when you’re using WordPress – You know how to blog like a pro but you have no idea what coding actually is and how web developers create that theme you’re using.
Going back to the main point, a webhost is the storage for your website, like files, images and all those stuff.
So without a webhost, your website will be in a very bad state because you will have insufficient space, slow loading, and all those problems that people sometimes have with a website.
That being said, a webhost is one of the most important things a website needs so moving your site to a better webhost is of utmost importance.
What You Should Know About Changing Webhosts?
Before changing your webhost and moving your sites, there are a number of things you need to know beforehand…
- Your emails will disappear – That’s right, different webhosts use different email services so it cannot bring the contents to your new host. From example, Hostgator uses Squirrel Mail but Wealthy Affiliate uses ATmail. I experienced this the hard way and I did not save my contacts so I ended up losing all of them.
- Website will not exist if you ONLY change the DNS – Changing the DNS will be one of the parts we will get to later on and when doing so, you need to understand that your website will be temporarily unavailable because you will also need to set up your site at your webhost. This is called ‘downtime’ whereby your website will be temporarily unavailable but don’t worry much about it because I’ll show you the best way to move your site with very quick downtime so your website will be up and running in no time.
- Your contents will not be there until you transfer it from your previous webhost – After changing your DNS from your domain provider, you will need to head over to your new webhost and set up your website again. Don’t worry if your website has nothing, what’s important is that your webhost KNOWS that you have ownership on that domain. When we finish transferring the content, your website will look exactly the same as before so don’t worry much about this part too.
Why I Choose Wealthy Affiliate’s Hosting Instead of Hostgator?

HostGator is actually my very first and only webhost that I have been using for 3 years until I finally decided to change.
I’ve always wanted to try and experience other webhosts but I’ve never had the chance because whenever I ask the support team about moving, they always have answers like “I’m not sure, please ask the other webhost that you are trying to move to”
One of the most common answers I get is “I’m sorry, I only know how to accept your websites if you are transferring your domains HERE and not the other way around” which always made me think as to why they wouldn’t just patch me to someone who does know.
For that very reason, I suppose my first point is that HostGator does NOT want to help you out if you are trying to change your webhost provider.
Logically thinking, there might be some explanations to that because if you go to KFC to ask how to get to McDonald’s, I suppose that they too would be reluctant to help you out because they just know that you are leaving them for their competitor.
Still, helping out clients are supposed to be your main priority and if you show them how to do that, they will surely think twice like “Why are they helping me get out? Do they not want me?”
So after that, I decided to contact Wealthy Affiliate’s support team to help me out.
In case you haven’t heard of it, Wealthy Affiliate is an Online Business course and community which teaches you all you need to know about building a successful website and monetizing it which is why the webhost service they provide is complimentary for members.
I have been with Wealthy Affiliate for a year now but I’ve never bothered to host my websites there so yes, I am paying for both Wealthy Affiliate and Hostgator when I know that I can simply move my sites to WA and save some good money along the way.
But what surprises me the most is that when Wealthy Affiliate taught me how to move my websites from Hostgator, they even told me that I can even move my websites away from Wealthy Affiliate whenever I want which is completely different than what Hostgator have been doing.
That made me wonder as to why are they willing to give me the knowledge to leave them anytime?
Being honest and unbiased when advising their customers is what made me want to stay at Wealthy Affiliate because it is hard to find that personalized service anywhere.
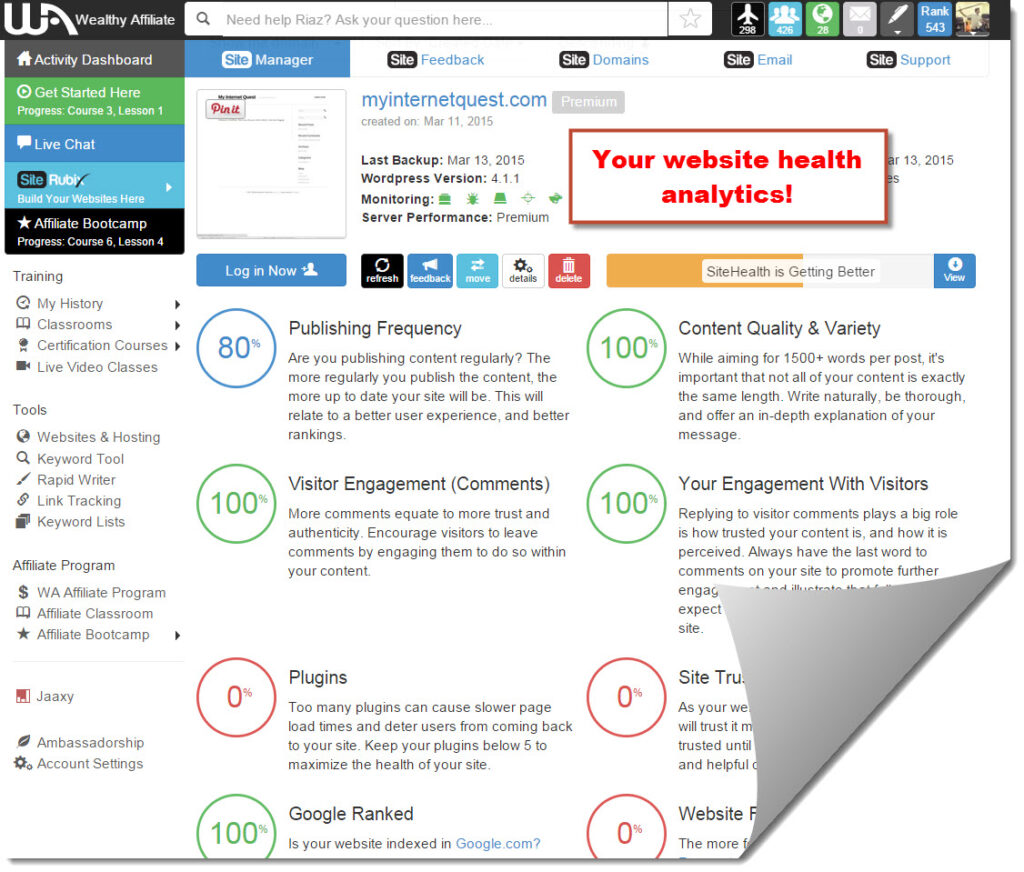
It doesn’t end just there, I also find Wealthy Affiliate’s hosting more professional as it provides you with your website SEO performance analytics.
Instead of just hosting your website and leave it be as how Hostgator does, Wealthy Affiliate went one step further and gives you more value by giving a website analyzer which tells you your website’s health and SEO performance.
What’s there not to love? It’s perfect for beginners and veterans alike as everything is laid out for you professionally.
I have been in the Online Business industry for a while but I never knew that having too many plugins can actually slow down my website speed!
Another thing that stresses me out a lot about Hostgator is that they cancelled my subscription 6 days early!
They noticed that I was asking a lot of questions on switching webhosts and I clearly have until 16th March before my account expires but after I submitted my form on the 10th of March, my account was instantly closed in a few hours!
Seriously?
I had 6 days of free usage WHICH I have already paid for the month plus I’ve been a loyal customer for a few years paying $14.95 monthly on my Hostgator plan.
I wanted to screenshot my cPanel and some of the info but since my account was closed suddenly, I haven’t had the chance to do so.
They stated that “We will keep your account active until the next renewal date” but sadly, it wasn’t the case for me.
I even contacted their support ticket but had no reply and the live chat kept me hanging.
But that’s all done now and fortunately for me, I finally managed to move my website to Wealthy Affiliate.
Oh and speaking which, Wealthy Affiliate provides a website move service whereby they can help you move your websites from one domain to another.
For example, when you want to change your domain name because you don’t find it as catchy, you can simply contact Wealthy Affiliate for help.
If you go to anywhere else, almost everyone would say that changing domains is impossible because everything about your website is stuck there and that once you buy a domain, you can’t simply delete it.
But Wealthy Affiliate managed to solve this by transferring your files to the new domain, and simply redirecting your old domain to your new one which I find really clever and innovative.
There are tons more advantages that I can talk about regarding Wealthy Affiliate’s webhost but maybe I should cover that in another blog post because I’m sure you’re just dying to know of…
How to Transfer a Website to a New Host? –My Top 7 Steps!
Finally, the moment you’ve all been waiting for!
I’ve actually made a video on this right here…
For the purpose of this tutorial, I am going to transfer my website from Hostgator to Wealthy Affiliate but don’t worry, it works fine with just about any webhosts.
Here’s what you will need to have…
- Domain provider (Like Namecheap and Go Daddy).
- Webhost (obviously).
- Your new webhost that you are transferring to.
- FileZilla
Don’t worry about the FileZilla thing because we’ll get to that later so here’s my 7-Step guide on how to transfer a website to a new host…
Step #1 – Go to Your cPanel and Backup Your Files
Even if you change your DNS, remember that all your files are still in your old webhost so without those files, your website will be nothing but an empty shell (Which means that your website will still be there, but without the contents).
I experienced this the hard way and it made me worried sick when I found out that my contents weren’t there.
This is because Webhosts are designed to be the heart of your website where your every content is stored, which is why the purpose of downloading your website contents from your old webhost is so that we can transfer it to our new webhost.
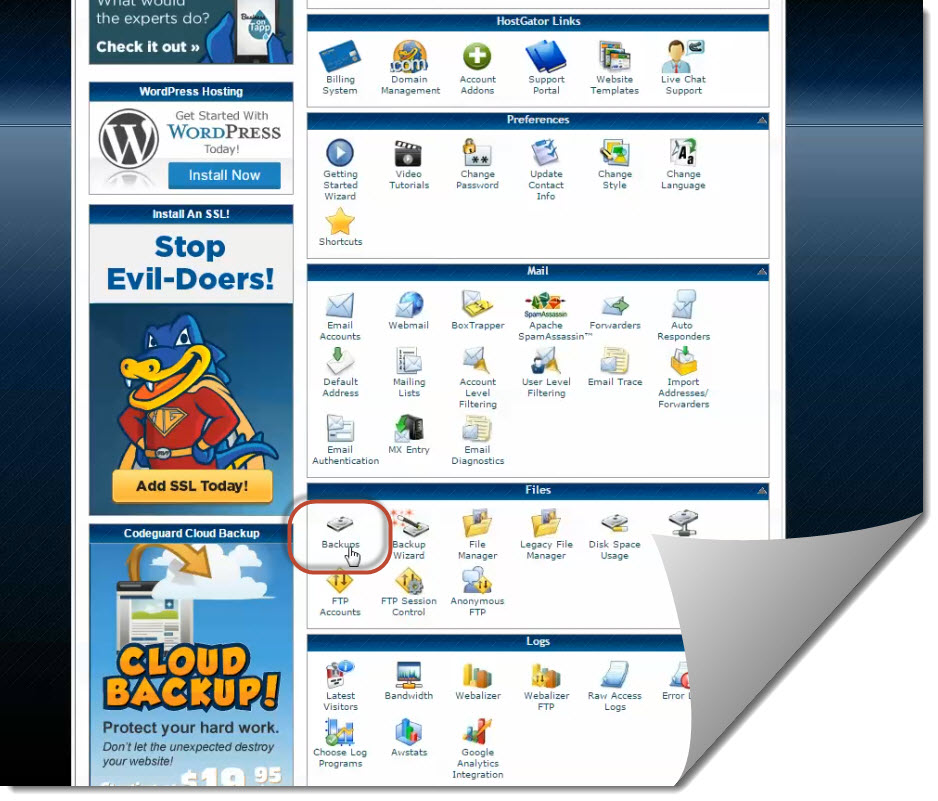
In order to back up your files, you need to head over to your old webhost and go to the cPanel.
Although I’m using Hostgator, CPanel should be almost the same for every other webhosts.
From there, go to the “Files” section and click on “Backups”.
Once you’re in, click on “Download or Generate a Full website backup” which will bring you to another page where you will lastly need to click on “generate backup”
One important thing you need to bear in mind is that this will backup up the whole webhost which means all your domains will be included as well.
Because of this, you are not backing up your files for just one domain.
Instead, you are doing it for every domain which is why we will need to separate those files later on.
Don’t worry about the download process, it would take some time depending on how big your files are.
For me, I have 4 domains so it took me at least an hour to finish backing up my files.
Once it’s backed up, your webhost will send you an email saying that it’s finished because you will need to head back to your webhost to collect those files.
Your backed up file will be very huge so your webhost will not email you the file – Instead, you will need to head back in there in order to download.
If you’re lazy like me, you could just simply open your webhost and leave it as it is until it finishes downloading so you can check on it from time to time.
Step #2 – Go to Your New Webhost and Register
If you haven’t already, you will need to head over to the new webhost that you are planning to change to and get a membership there.
I recommend Wealthy Affiliate as your webhost so that you won’t need to worry about choosing packages and upsells because members have the same quality service.
I have to warn you though, it is pricey but that makes up for its quality service, hosting and valuable lessons.
When it comes to having a webhost, it is actually the heart of your website so it is not wise to get a free one due to reasons such as limited space, limited control, full of spam ads, constant downtime and slow page loads.
In the Online Business world, having your website at the peak of its condition is of utmost importance if you are to rank in Google faster and receive more conversions.
Sure, you can get a cheap webhosts for as low as $3 a month but you will get what you pay for – Cheap unreliable webhost which compacts thousands of websites altogether within one server.
Wealthy Affiliate on the other hand, is a platform for anyone who wants to build up websites for business so because of that you will get a server of your own with a dedicated team of support – You’re definitely in safe hands.
Once you’ve secured your webhost of choice, you will need to…
Step #3 – Go to Your Domain Provider and Change Your DNS
Domain Name Server (DNS) is what links your website to your webhost.
However it does not link your contents as well which is why we did the file backup in the first place.
Now we’re not going to upload the backed up file just yet because for this step, we will be changing our DNS so that your webhost will get the signal.
So now, we will first need to go to your new webhost and get the DNS there because we will be needing it.
After that, you will need to head back to your domain provider and change the current DNS there to the one which we copied from the new host just now.
For the purpose of this tutorial, I’ll be using Namecheap but it should be almost the same for any other domain providers.
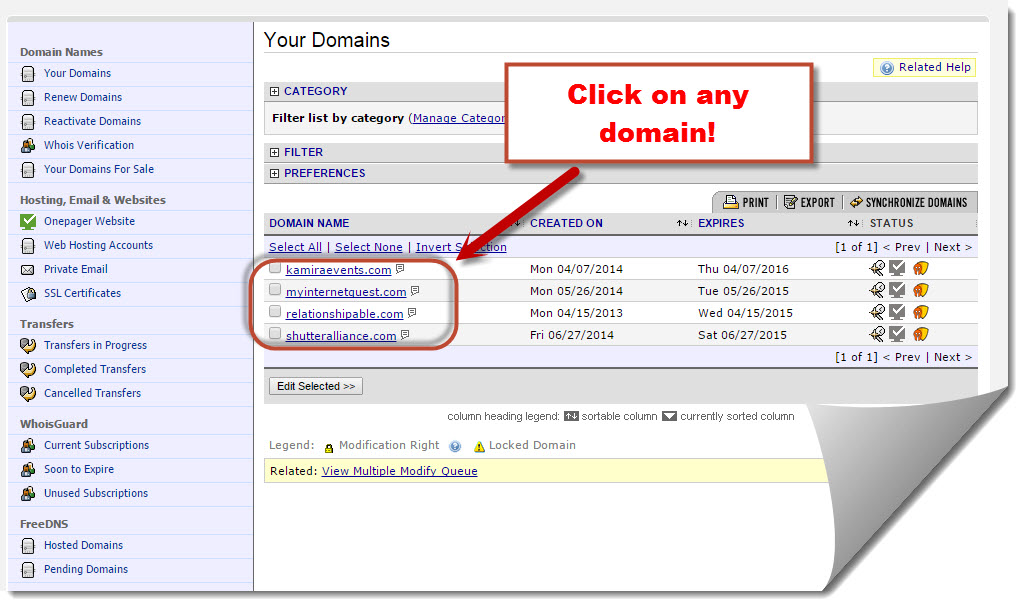
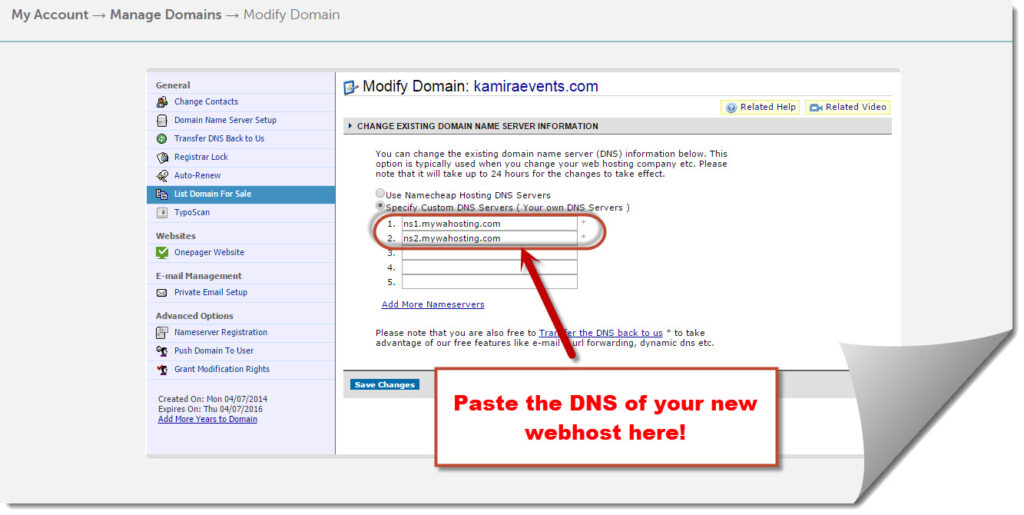
From your Namecheap login, click on “Your domains / products” link which is located on your right.
That will bring you to your list of domains you have so from there, simply click on the domain you wish to choose.
Do note that you can’t transfer all domains in one go – You need to transfer them one-by-one.
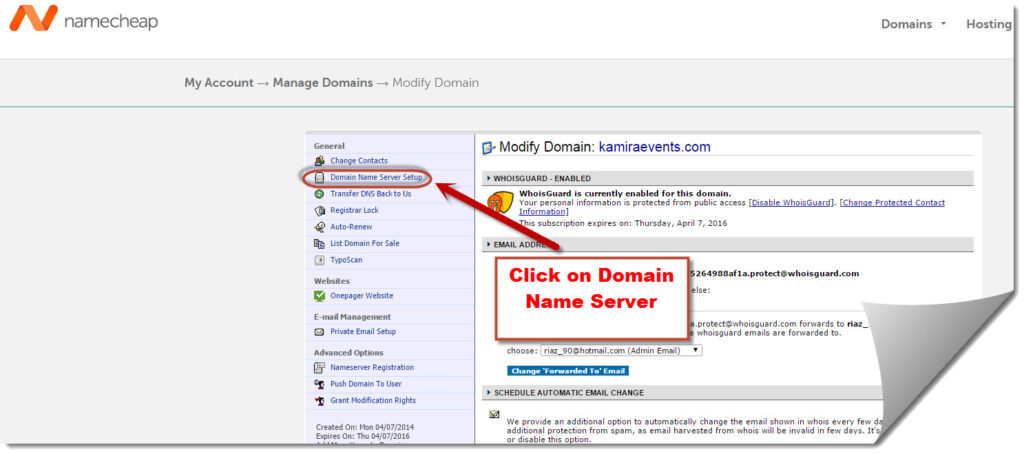
After clicking on the domain, click on “Domain Name Server Setup” which will be located on your left.
From there, you will see boxes under “Specify custom DNS servers” which is where you agree going to need to paste that DNS which you copied from your new webhost just now.
Doing this will let your domain provider know that you trust the new webhost which will make the process easier.
There are always 2 DNS boxes which you need to fill in and in the case of Wealthy Affiliate, it’s…
Primary Nameserver: ns1.mywahosting.com
Secondary Nameserver: ns2.mywahosting.com
It should be something like that for every other webhost and there is always only two DNS to fill in so don’t worry too much on this.
Once you’re done, we can proceed to the next step which is…
Step #4 – Go to FileZilla and Upload Your Files
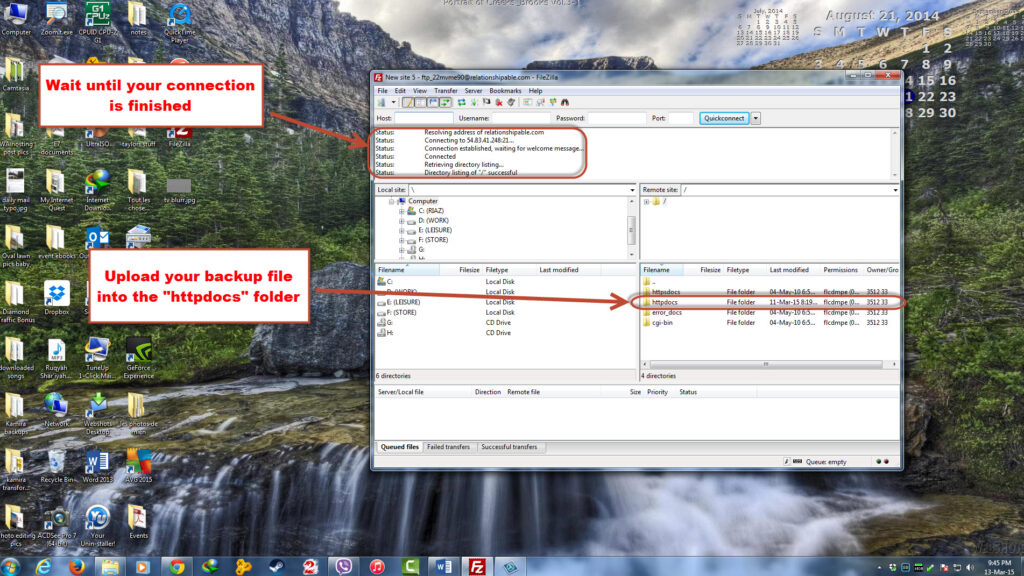
FileZilla is an FTP client which is a powerful tool every webmaster use to transfer files over the internet.
You don’t need to worry about the price because it is free!
To install FileZilla, click here.
Although installation is free, you will always tend to get ad spams if you click on that big “download now sourceforge” button but to avoid that, simply click on “Show additional download options” and you can install it just like that!
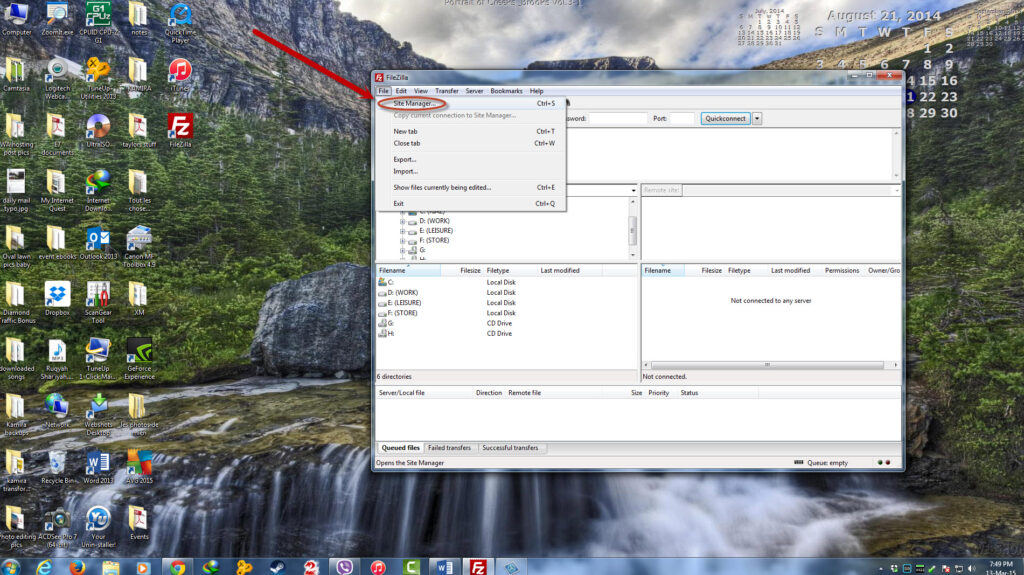
After installing, open up FileZilla and click on “files” and on the drop down.
Click on “Site Manager”
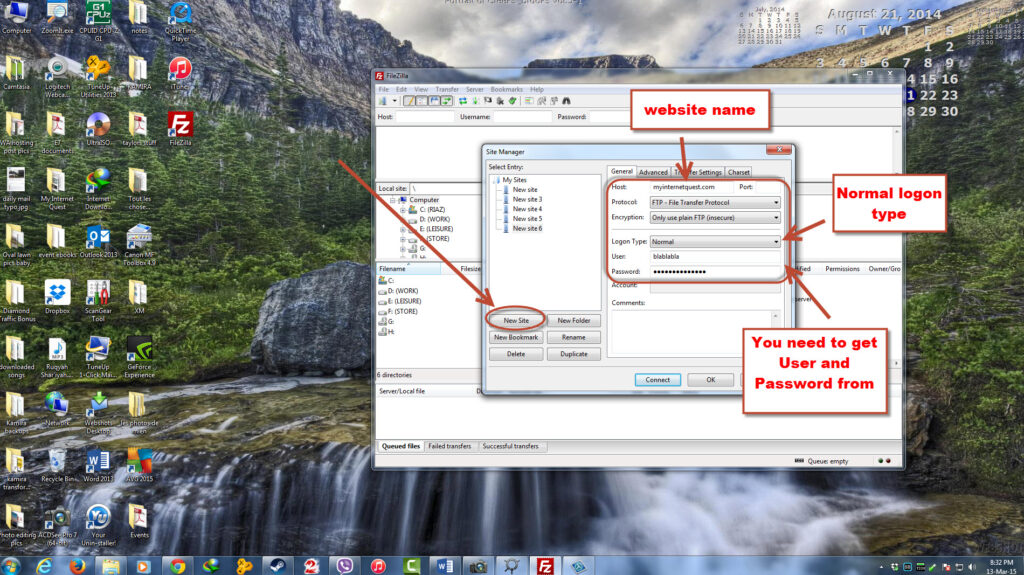
Once you’re here, click on “New Site” and this will open up some things which you will need to fill in on your right.
Okay the part after this is going to be a bit complex so you will need to pay close attention.
For the “Host” part, you need to fill in your domain name WITHOUT the www thingy.
For example, Myinternetquest.com.
As for “Port”, you can leave it blank.
As for the “Protocol”, make sure it’s under “FTP – File Transfer Protocol”
For “inscription”, make sure it’s under “Only use plain FTP (insecure)”
Make sure the “Logon type” is “normal”
And now, we are down to the last 2 things we need to fill in which are the “User” and “Password” part at the bottom.
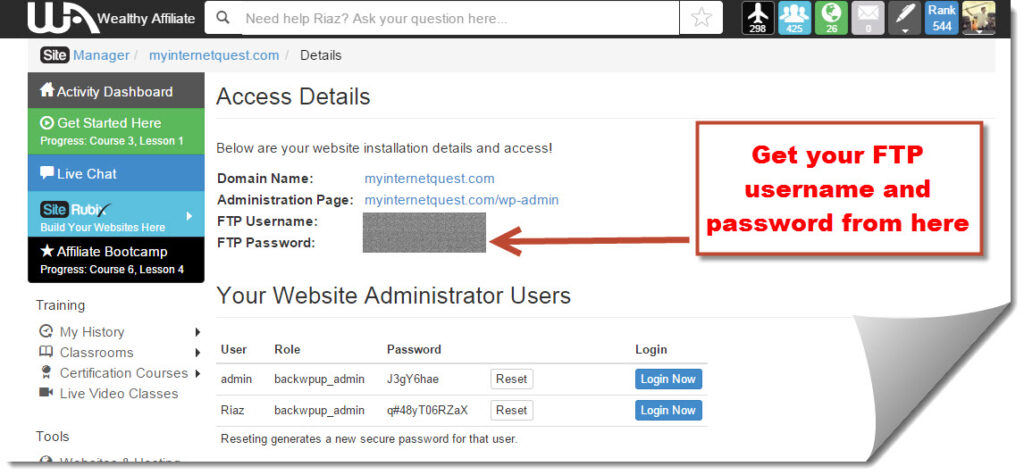
This is VERY important because you will need to actually get your FTP username and Password from your new webhost.
Every webhost have this, you just need to find it but if you can’t, simply ask your support team and they’ll give it to you.
I’m using Wealthy Affiliate for my webhosting so in order to get my FTP username and password, I only need to go to “Domains and hosting” and click on “Details” for any website I want.
After getting your FTP username and password, type in FileZilla and click on “Connect”
This will bring connect your FileZilla to the internet so that you can see the files you have.
You will see that your FileZilla has now some words coming up telling you that it’s establishing connection and after it’s done, you will see a bunch of files on your right.
You will want to click on the “httpsdocs” folder because that’s where we will be uploading our content files.
Simply drag and drop your backup file (The file you backed up just now at your old webhost) and all you need to do now is just wait!
The uploading can be quite long depending on the size of your file so please wait for a while because I promise you that it’s going to be the last waiting you’ll be needing as you won’t need to upload anything anymore!
Hurray!
Now you’ve uploaded your files, you will then need to…
Step #5 – Contact Your New Webhost to Check for Your Files
Now we’re down to last part of a successful webhost transfer – Checking if your files are there!
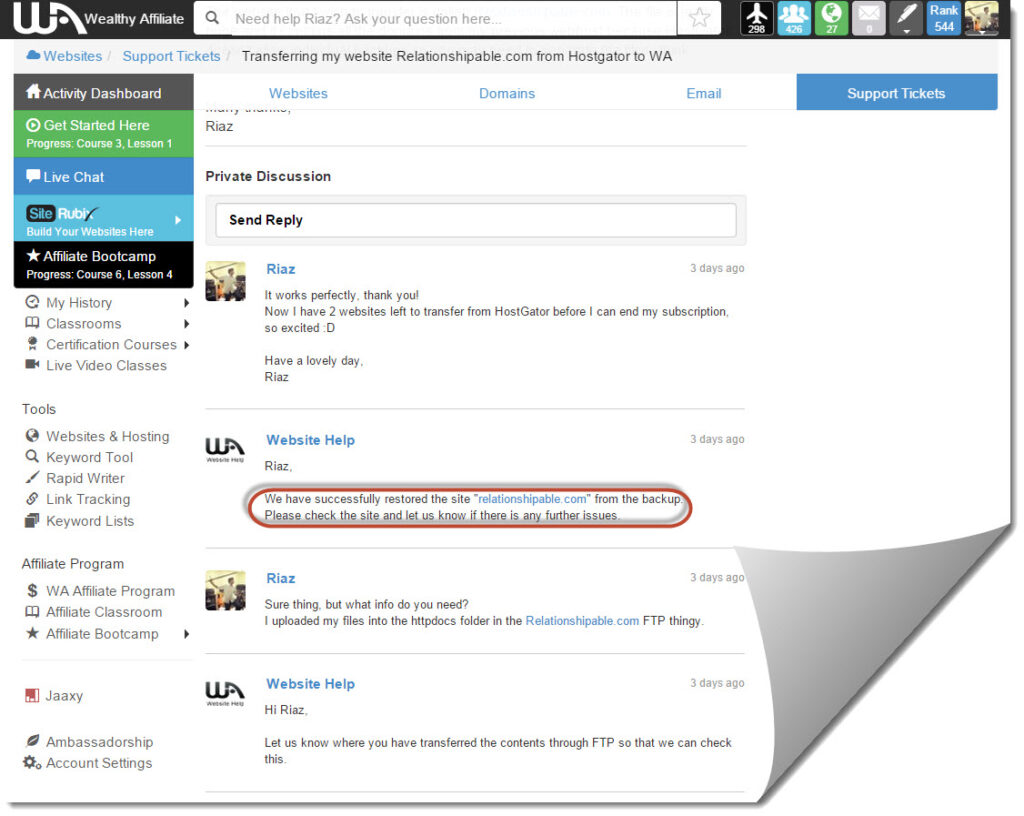
After uploading your files through FTP client, you webhost should now receive those files now but remember, that file contains all your other domains as well so you’ll need to tell them beforehand.
Don’t worry, they are all very friendly and they can separate those files in no time at all.
It took me only a few minutes for them to check and they’re done!
The support team will ask you for the location of the folder you uploaded the backup files so for that, just tell them it the “httpdocs” folder and they should sort it out in a moment’s notice.
So now you’re done transferring your website, yaay!
That is all to it and you won’t need to use FileZilla or other technical things we did just now ever again.
Step #6 – Cancel Your Old Webhost
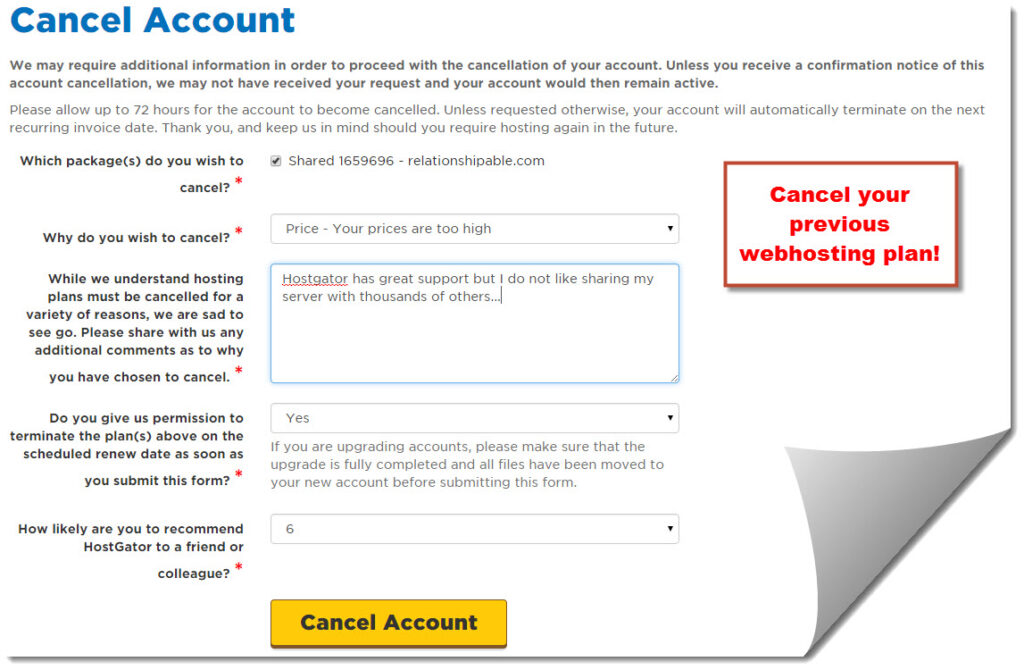
Now when all is said and done, you’re basically free to do anything and resume your website duties but I would advise you to cancel your previous webhosting plan just in case.
Some plans might auto-charge you still which is why you would need to cancel that as well or simply do that from PayPal either way.
Some people might prefer keeping their plans alive on their previous webhost but personally, I’d like to tie up loose ends so I won’t have to worry about my previous webhost ever again.
Step #7 – Check Out Your Website!
Now you’re done!
If your website is still the same, don’t worry much about missing files because the contents are exactly the same as before.
You might lose your email client though, but contacts can always be rebuilt.
Conclusion
Sometimes it’s much better to change to a new webhost if you feel like the previous one is a burden.
Though the steps of moving a website is highly tedious, that leap of faith is definitely going to be worth the trouble when you know that your new webhost is going to be much better, faster and more secure for your websites.
Thanks for reading, if you want to learn more about why I’m using Wealthy Affiliate’s webhosting services, check it out here.


