So you have a beautiful website and awesome content but still, you are not getting any shares whatsoever.
You try harder to make your content longer and add more pictures but you still wonder why nobody seems to share, even though you are getting a steady amount of visitors.
Well the answer to that, is because your website doesn’t have a social media sharing widget!
Having a Social Media Sharing widget can do wonders in getting your website visibility but without any of those buttons for your visitors to click on and share, they won’t seem to care much on doing it the manual way,
What is a Social Media Icon?
For most of us who are used to the world of social media, we may be well accustomed to what it means and what it does but there are still many people who are not used to getting social.
Many people have never heard of Flickr, Pinterest, or even made a Facebook account.
I know this because I too, was one of them.
But after delving into the Online Business world and making my own website, I realized that I needed to start and learn about social media in order to leverage them and get more traffic to my website.
So what is social media?
Well, they are simply websites but they are not just focused on sharing content, they also act as a platform for users to mingle and communicate or create a community.
Most social media sites don’t even have much content because the rest are made by the community of people which is why they are very powerful as word of mouth is always better than advertising.
A lot of companies establish their image in social media sites like Facebook and Twitter because they want to increase visibility, branding as well as being closer to their customers which is why we will need to learn how to do that on our websites too.
However, different WordPress themes come with different layouts and not all of them have social media buttons and that is why we shall learn how to make our own social media buttons today.
Benefits of Placing Social Media Icons of Your Website
Regardless of what people say, there are many benefits of having the social media sharing buttons on your page and those are…
- Increase visibility – When your readers like what you published, they will tend to share on their social media accounts like Facebook or Twitter and by doing so, exposing your website to their friends and families thus increasing your reach.
- Increase Google rankings – One of the main things Google look at when determining your website ranking factors is how much interaction you have on your site or how many times are your posts being mentioned. Since many people will be sharing your content and interacting with it, your Google rankings will rise up as well.
- You gain more trust with your readers – Having Social Media brands for a business actually has a psychological role in it – People think you are big! Who wouldn’t if you see that certain company almost everywhere you go? For a company to be established anywhere, it takes hard work and people understand that which is why they also understand how trustworthy you can be to reach that far.
- You gain an edge in competition – Have you ever noticed how all huge websites have established their Social Media profiles? Like if you go to Facebook and Twitter you can see those companies like Marks and Spencer or even Hilton Hotel. This is because they all establish their accounts at Social Media sites!
- More sales! – With huge reach and trust being built through social media, one thing that always comes after is sales! The more people like you and what you’re offering, the more likely they would want to buy things from you.
How to Add Social Media Sharing Buttons on Your WordPress Site?
There are many ways on how to add those social media icons on your WordPress sites be it on your sidebar or on your post but fret not, because here’s a quick video I made on how to rock those buttons…
Alternatively, here’s a more detailed 5-step quick guide I made on how to cover both of those issues in one go!
Step #1 – Installing the “Social Media Widget” Plugin
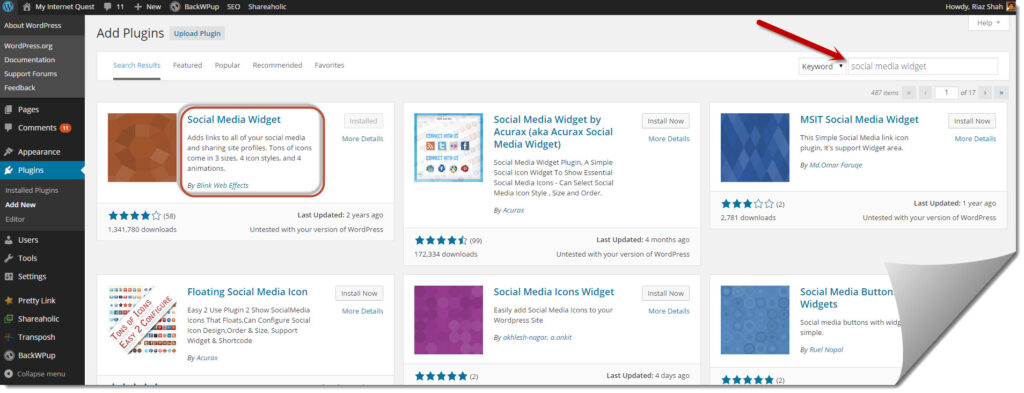
The first step to getting your social sharing buttons is to install the plugin called “Social Media Widget” by Blink Web Effects.
The reason we are installing this plugin is because we want to add Social Media icons on our sidebar.
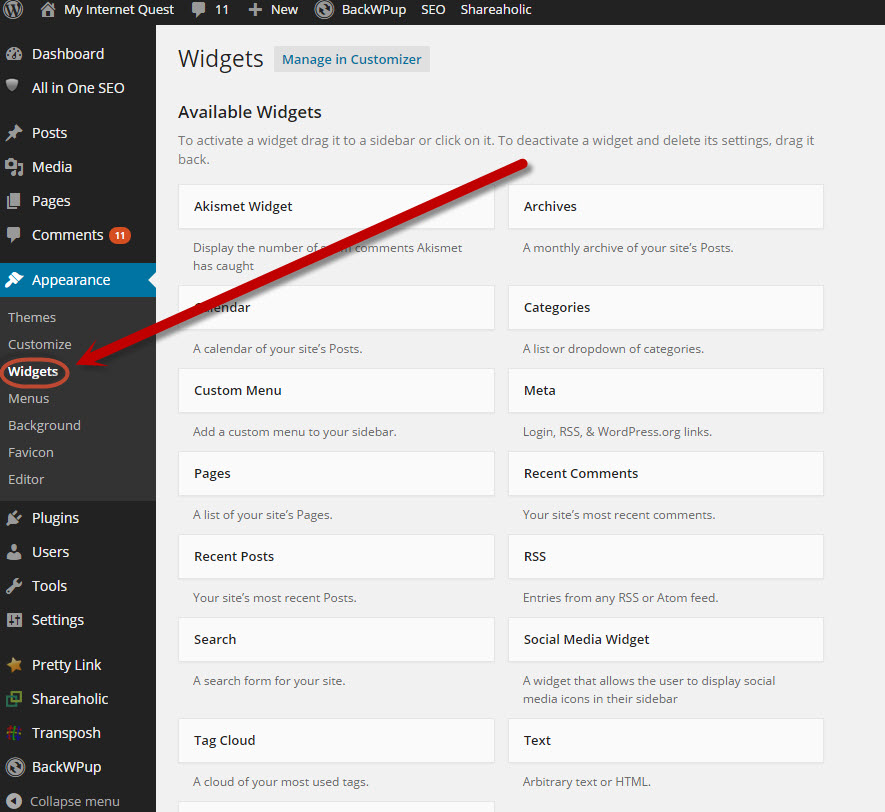
Once installed, you need to head back to your WordPress dashboard and click on Appearance, followed by Widgets.
This will bring you to the widgets section where you can alter everything you want on your sidebar which as you may have already guessed – The Social Media icons on your sidebar.
Step #2 – How to Get the Social Media Icons on Your Sidebar
Now that you’re at the widgets area, setting up those buttons might be a bit tedious as you have to add in your links.
But, it’s actually very simple.
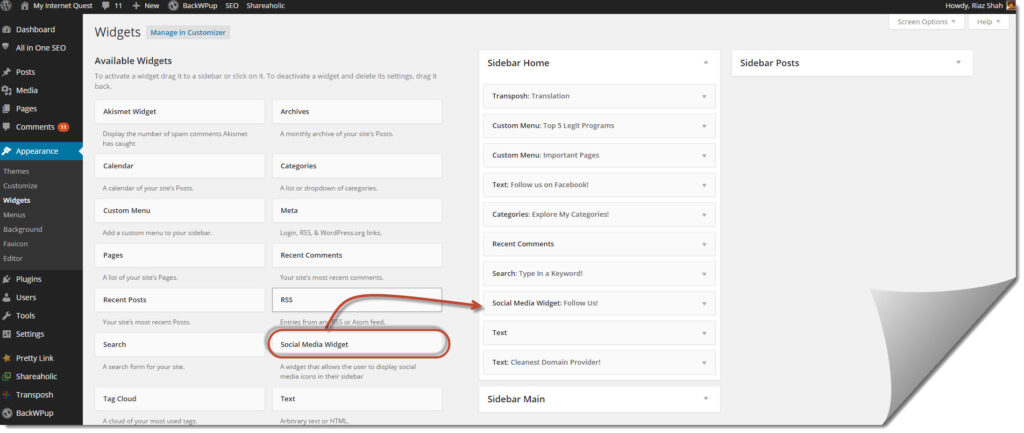
If you look at your “Available Widgets”, you will notice that there is something called the “Social Media Widget” somewhere at the bottom.
Now this wasn’t there initially, the reason it is there now is because we installed the plugin just now.
From there, simply drag and drop the “Social Media Widget” box to the Sidebar Home area on your right.
Or you could even drag and drop it at your Sidebar Posts or even Sidebar Main, it doesn’t really matter (I drag and dropped it on all because I want my Social Media icons to appear on all of my pages).
If you don’t know what Sidebar Posts, Home and Main stands for, here’s a quick definition – Sidebar Home is your website home page, Sidebar Main is for your pages that you created whereas Sidebar posts are for your blog posts.
Now the fun part begins.
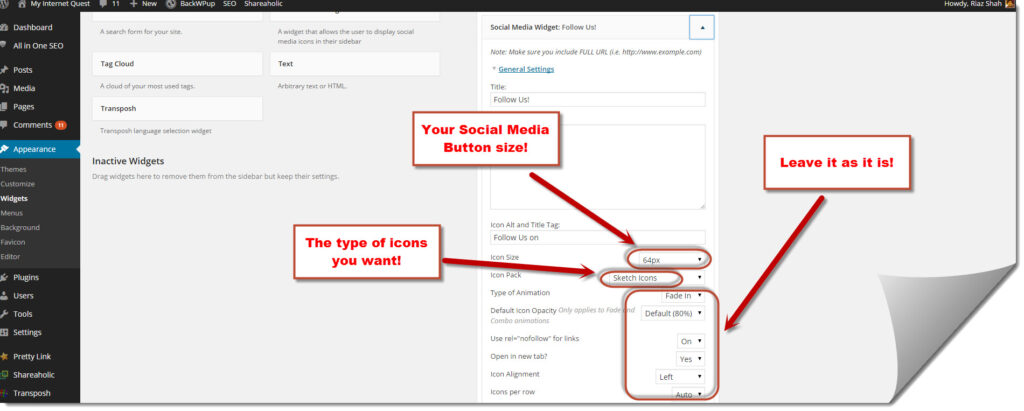
Click on that “Social Media Widget” box that you just added, it will open up into a drop down where there are loads of things you can fill in.
Don’t be overwhelmed with this, you don’t actually have to fill in everything though – You need only to fill certain spaces and you’re good to go!
Okay, so under the “General Settings”, here are the things you need to concern yourself with…
- Icon size – The size of your icons which you will want to appear in your side bar. 64px can fit it 4 in a row.
- Icon pack – The type of icon you want, like heart shape or sketch shape.
That’s all!
From “Type of Animation” to “Icons per row”, you can leave it as it is because it won’t do much for your social share icons.
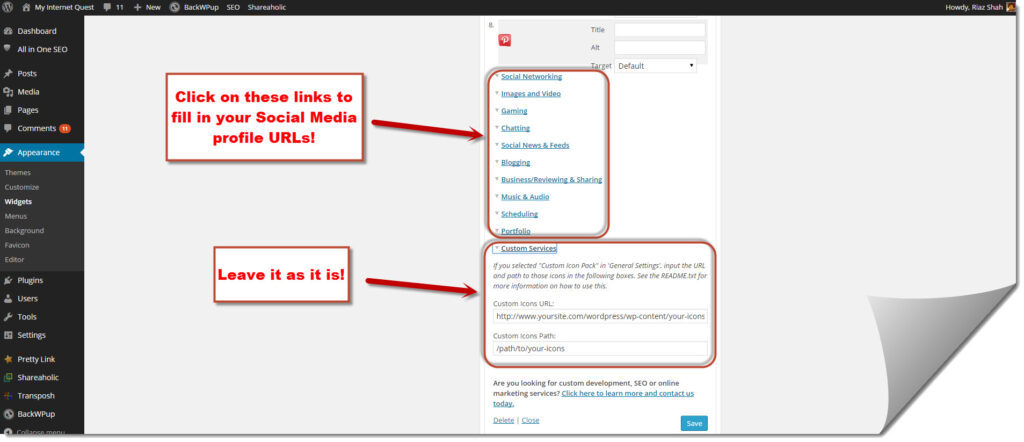
Now that we’re done with “General settings”, we are going to move on to the rest which is the easy part.
From “Social Networking” to “Portfolio”, you just basically need to fill in your URL for your Social Media accounts like Facebook and Instagram and that’s it!
You don’t have to add in all, I personally only used a few and once you’re done, all you need to do now is save and watch the end result.
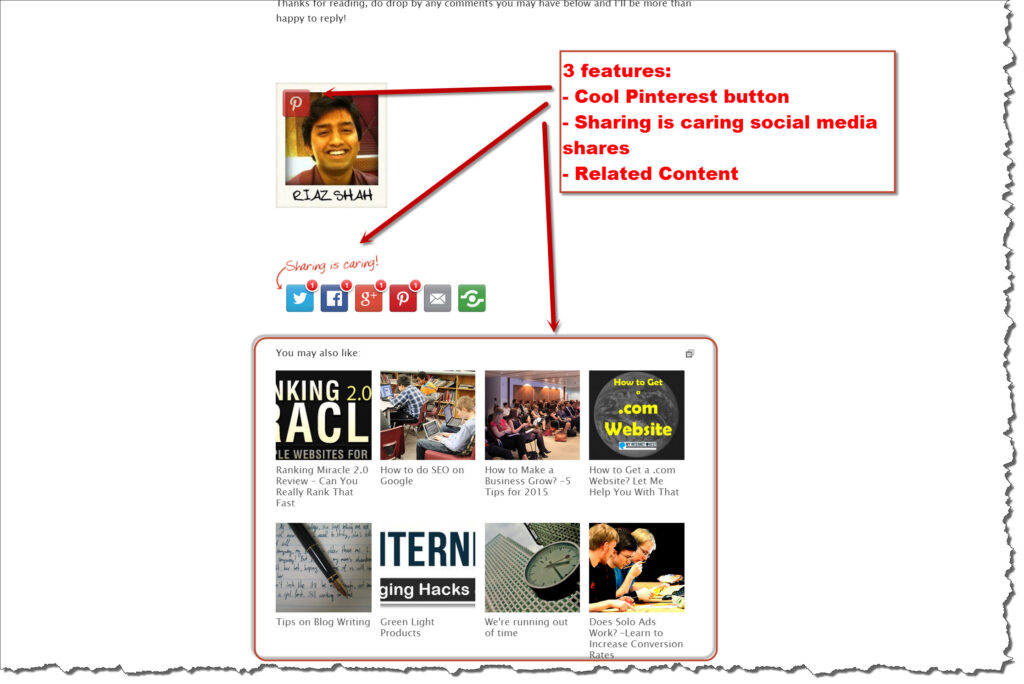
Here’s how mine looks like…
That’s it, we’re done for the sidebar icons!
But what happens if you want those social media buttons on your posts and pages instead?
Well that my friend, requires us to…
Step #3 – Install the “Sharing is Caring” Plugin
There are many plugins providing social media shares for posts but the one I particularly like is the Sharing is Caring plugin.
This is mainly because I find it catchy but more importantly, it also comes with 2 extra features which no other social sharing plugins has which are the “Related Contents” section and also the big juicy Pinterest button for all images.
This in a way is great in saving space in your plugins list so that you won’t have to install each plugin for each feature which can lead to your website feeling ‘heavy’ if there are too many of them.
To install the plugin, simply look for “Shareholic” made also by Shareholic, it’s hard to miss.
Unlike the previous plugin which we installed earlier, you won’t need to go to your “Widgets” section of your WordPress dashboard to use the Sharing is Caring plugin.
Instead, simply look at the bottom-left of your WordPress dashboard to see the Shareholic app (Yes, it’s on its own).
Believe it or not, you’re 80% finished JUST by installing because all that’s left now is to learn…
Step #4 – How to Get the Social Media Sharing Buttons on Your Posts.
So you now know how to get the Social Media icons on your sidebar, but do you know how to place those Social Media share buttons on your blog posts as well?
That’s exactly what the Sharing is Caring plugin is for!
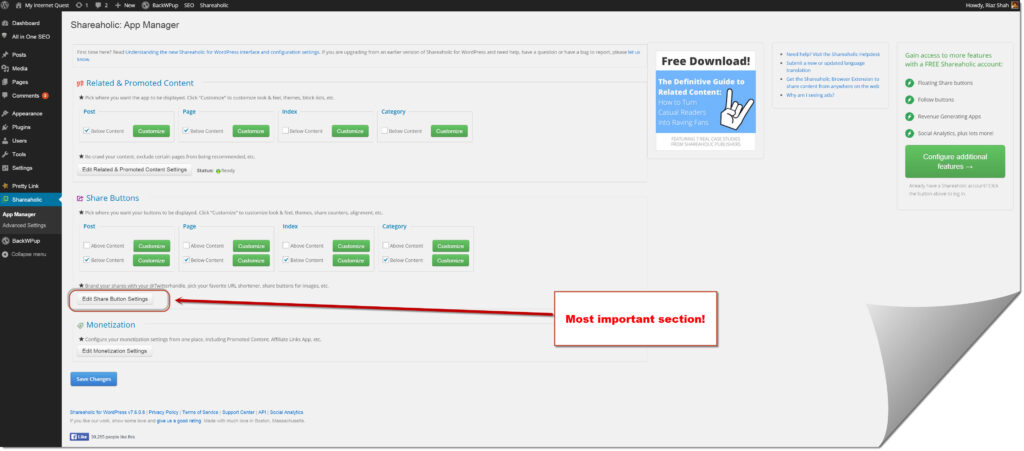
From the “App Manager” section of Shareholic, you can control almost everything about the Social Media sharing buttons for your posts.
It is divided into 3 sections…
- Related and Promoted content – This is a little something that finds your other contents that you have published before and put it at the end of your articles, hence the “Related contents” section. It can go a long way to increasing the time people spend on your website.
- Share Buttons – Now this is the main thing that we are looking at, the controller for social media share buttons on each of your contents. It’s pretty straightforward where you just have to tick boxes and you’re done!
- Monetization – Remember the “Related and promoted content” section I mentioned just now? Well monetization is a clever way of earning money by placing an advertisement and camouflaging it as your own content.
You need only to start tweaking and those buttons are yours to behold!
I have made a blog post especially on the Sharing is Caring widget, check it out here.
Step #5 – Test Out Your New Buttons!
By now you should have cool buttons of you own ready for the world to see.
There are 2 social media buttons we placed today which are at the sidebar as well as at the end of your articles so you might want to check if it works.
As pretty as those buttons may be, it would not give you any conversions if it’s not working well not to mention making your site look cheap.
Attention to detail is what separates a successful entrepreneur and a normal everyday person.
Want to Make Full Use of WordPress? -Learn Online Business the Only Way you Can!
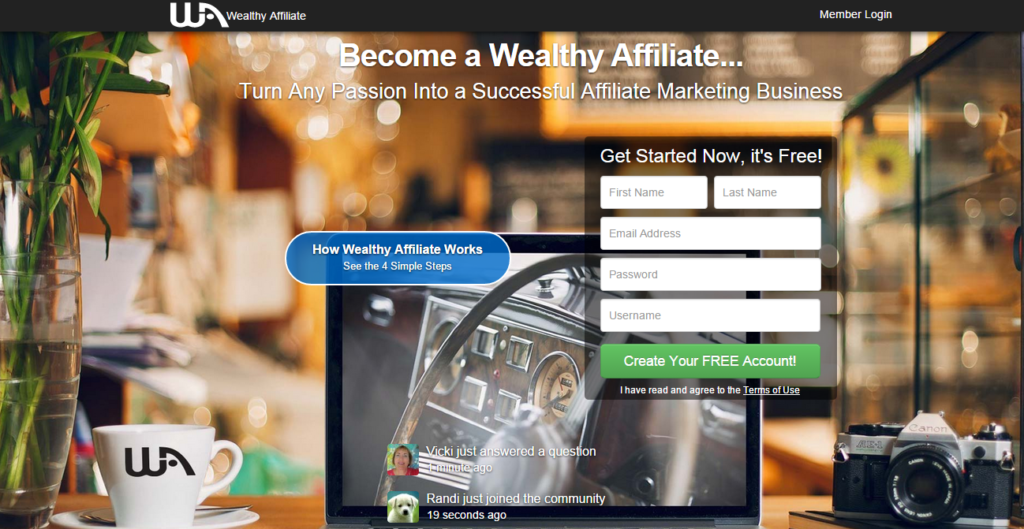
Building an Online Business is always seen as complex and hard, especially when the idea of building a website comes to mind which is why I’m recommending you to have a go at Wealthy Affiliate.
Wealthy Affiliate is an Online Business course which teaches you how to build your own income stream online by building your very own quality website through WordPress.
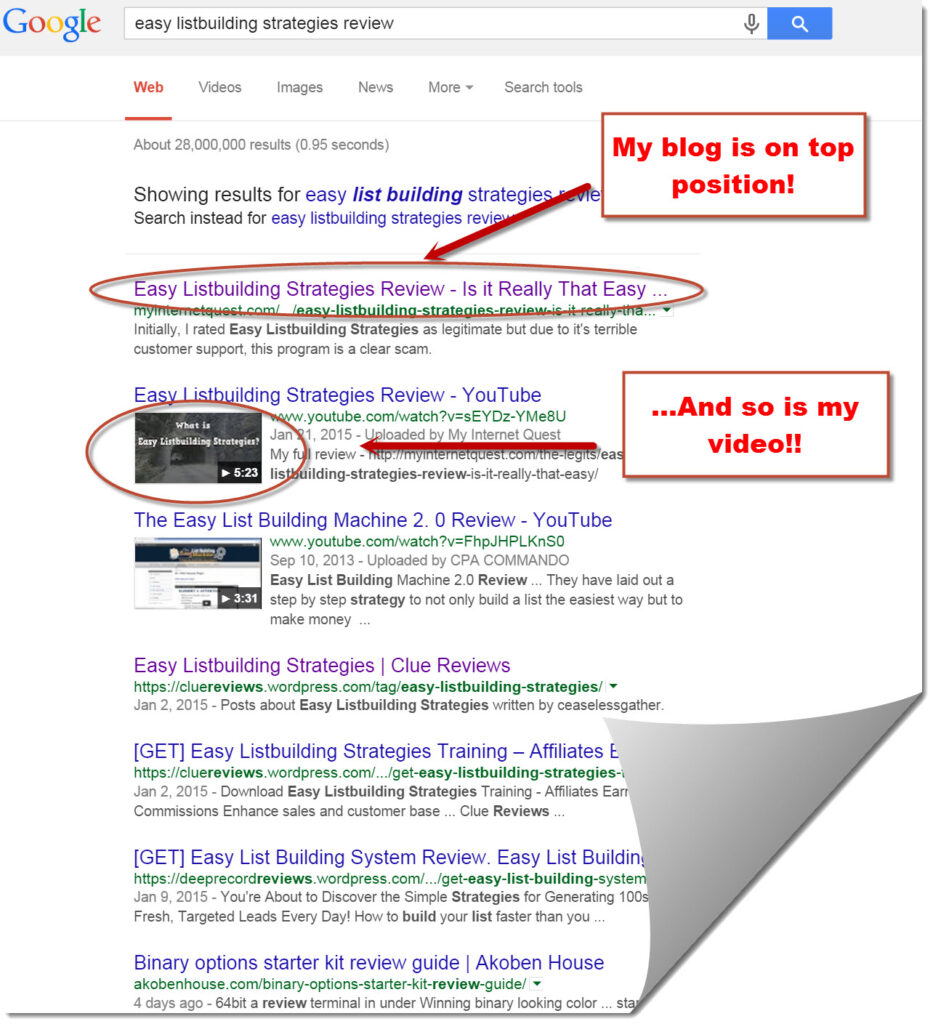
The lessons are beginner-friendly, the community is awesome and the tools are made in a way to help your website rank better in Google such as this…
I managed to rank my page on first page of Google!
Although not all my blog posts are on the first page, I’m slowly getting there and I’m starting to understand what makes Google think.
The knowledge is awesome simply because it makes you put in effort in order to boost your website like it’s your baby and why I would recommend anyone to join if you already have basic knowledge in using WordPress.
So what are you waiting for?
Conclusion
Social Media can do wonders in giving your website a better image and higher conversions.
Learning how to be social in platforms such as Facebook and Twitter has a huge effect in bringing traffic from those sites, to your own site so with your newly-added Social Media buttons, your website is going to see higher traffic statistics in no time at all!
If you’re interested in learning more about building an Online Business through WordPress, check out my #1 recommended program here.
Thanks for reading, do drop any comments you may have down below and I’ll be more than happy to reply 🙂




This is very handy, Riaz. Been looking for it everywhere! Thank you
Anytime, Shirley.